Live! module
Overview
LiveController provides the following functions:
- Communicate with the DataMesh Live Agent of the HoloLens on the Rig to synchronize spacial anchors in real-time.
- Use of keyboards to adjust the position and angle of the Anchor, if the automatical synchronization failed.
- Control the upload and download WorldAnchor from Live Agent via the Workstation.
- Compose the images captured by the camera on the Rig with virtual scenes, and cast it out.
- Record the composed video stream as MPEG-4 file with a maximum resolution of 4K.
Please follow the instructions below to create a demo app.
How to integrate Live! function to a project
It's very easy to integrate Live! function to any project which made by METookit.
-
Open any project which made by METoolkit.
-
Open Player Settings, and open Other Settings panel.
-
Add a compilation parameter "ME_LIVE_ACTIVE" into Scripting Define Symbols field.

- Now your project will became a Live! project.
Config for Live!
Live! will load a config file when program start. You can create or modify this file.
- Find Asset/StreamingAssets folder, and create a file named MEConfigLive.ini
- The content of this configuration file like this:
###############################################
# config for Live
###############################################

#### Live Workstation Server Port (For SpectatorView) ####
Live_Port = 8099
Live_Port_UDP = 8098
Use_UDP = TRUE

#### HologramCapture Config
Out_Put_Path = C:/HologramCapture/
Usually, you don't need to change Live Port.
If you don't want use UDP mode, you can set Use_UDP=FALSE, so program will use TCP to transfer location data.
You can set a path to save Span and Record file. Ensure the program has write permissions to this folder.
Important: If your app is NOT running on Unity Editor or PC Standalone (e.g. HoloLens, iOS, Android), app will load config file at PersistentDataPath, not from StreamingAssets. For more information, please refer to Utility: Config Files
Build Live! program
Build a PC Standalone program, and select Architecture to x86_64.

It will create a exe file and some folders. You can deploy them to your Workstation.
Start to Use
-
Start DataMesh Live Agent App on the Hololens of the Rig.
-
Start ".exe" program on the Workstation.
-
There will be an operation panel on the screen:

Connect to HoloLens Spectator View
-
Click the "Connect HoloLens Spectator View" button on the right-side panel. Then the program would try to connect to the HoloLens on the Rig.

-
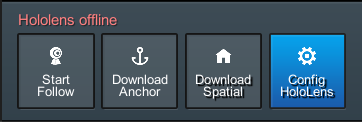
If the connection succeeded, an echo text "HoloLens connected" would show up. Otherwise, "HoloLens offline" would appear. When connection failed, retry from the first step.
-
With a successful connection, the program will try to synchronize automatically, and the "Start Follow" button would turn blue. You will see from the monitor screen that the real-time Holographics are captured.

- If you want to synchronize with another HoloLens, you need to:
- First click "Stop Follow" to stop synchronization.
- Then Click "Download Anchor".
- Upon success, the position of the Holographics would change and the synchronization would start automatically.
- If an alert of anchor not positioned appears, it means the spacial information scanned by the two HoloLens is different. You need to move the HoloLens to do a rescan until the alert disappears.
- You can download the spatial mapping information (Meshes) from HoloLens, so you can simulate spatial mapping on your workstation.
- Click button Download Spatial, and when download finished, you can see tips on right-top
- Spatial mapping meshes will only appear in Anchor Move mode. Start to move anchor, click an anchor, and select Gaze button in the middle, so you can see the meshes

HoloLens Status Panel
- If Config holoLens Button shows blue, you can see the HoloLens Status Panel. If you connected HoloLens with USB line, there will show the information of HoloLens. You can check following information here.
- IP of this HoloLens
- Which wifi network this HoloLens joined
- Spectator View App version
- If the spectator view App is running
- Remaining battery capacity

Note:
- You need input your account and password of HoloLens when you login first time.
- Some information you may need to keep the HoloLens turn on.
- These information based on Windows Device Portal by USB, so you need to install Visual Studio in your computer.
Snap and Record
-
There is a MR preview window in the upper right corner. You can click the "Full Screen" button to make it display in Full-Screen Mode, and to exit press the "Esc" key on the keyboard. You can also click "hide/show Preview" to hide or show the Preview window.
-
To record a MR video, click "Begin Capture". And a red "REC" sign would appear on the window as an indication. To finish recording, click "Stop Capture", and you can see the video file at the path you configured previously.
-
To capture a screenshot, click "Take Snap" to save the captured picture to the same path for video recordings.